Difference between revisions of "Test Circuit used for ACID reverse engineering"
From CPCWiki - THE Amstrad CPC encyclopedia!
(Created page with 'ACID Reverse Engineering == Schematic == Desoldered ASIC chip from Fano's cartridge (thanks, Fano), attached to PC's parallel printer port: ACID PC CLK --…') |
|||
| (13 intermediate revisions by 3 users not shown) | |||
| Line 3: | Line 3: | ||
== Schematic == | == Schematic == | ||
| − | Desoldered [[ | + | Desoldered [[ACID]] chip from [[User:Fano| Fano]]'s cartridge (thanks, Fano), attached to PC's parallel printer port: |
ACID PC | ACID PC | ||
CLK ---- Strobe | CLK ---- Strobe | ||
| Line 11: | Line 11: | ||
A0..A7 ---- Data 0..7 | A0..A7 ---- Data 0..7 | ||
GND,5V ---- GND,5V | GND,5V ---- GND,5V | ||
| + | |||
| + | == Source Code == | ||
| + | |||
| + | For curiosity, here's the original source code used for reverse-engineering. It's barely commented or user-friendly. | ||
| + | * [[Media:AcidTest.asm]] | ||
== Pictures == | == Pictures == | ||
| − | <gallery caption="Original circuit"> | + | <gallery caption="Original messy circuit"> |
Image:AcidTestOldTop.jpg|Top | Image:AcidTestOldTop.jpg|Top | ||
Image:AcidTestOldBottom.jpg|Bottom | Image:AcidTestOldBottom.jpg|Bottom | ||
| − | Image:AcidTestOldWorkplace.jpg| | + | Image:AcidTestOldWorkplace.jpg|Parents desk |
</gallery> | </gallery> | ||
This is original circuit, assembled while I was visiting my parents. I couldn't find a 36pin centronics socket, only a (very) old 25pin RS232 cable, so I needed to use that. | This is original circuit, assembled while I was visiting my parents. I couldn't find a 36pin centronics socket, only a (very) old 25pin RS232 cable, so I needed to use that. | ||
| Line 23: | Line 28: | ||
---- | ---- | ||
| − | <gallery caption="Newer circuit"> | + | <gallery caption="Newer clean circuit"> |
| − | Image: | + | Image:AcidTestHomeTop.jpg|Top |
| − | Image: | + | Image:AcidTestHomeBottom1.jpg|Bottom |
| − | Image: | + | Image:AcidTestHomeWorkplace.jpg|Nocash Headquarters. |
</gallery> | </gallery> | ||
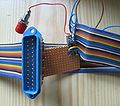
| − | When I came back home, I wrecked the original circuit, and made a miniaturized adapter with robust centronics socket. Not that I'd still really needed it | + | When I came back home, I wrecked the original circuit, and made a miniaturized adapter with robust centronics socket. Not that I'd still really needed it - I've been already done with the rev engineering at that time - I just don't like messy cables. |
| + | |||
| + | [[Category:CPC Plus]][[Category:Cartridges| ]][[Category:DIY]] | ||
| + | [[Category:CPC History]] | ||
Latest revision as of 17:07, 19 December 2010
ACID Reverse Engineering
Schematic
Desoldered ACID chip from Fano's cartridge (thanks, Fano), attached to PC's parallel printer port:
 ACID        PC
 CLK    ---- Strobe
 CCLR   ---- Init
 SIN    ---- Busy
 /OE    ---- Select
 A0..A7 ---- Data 0..7
 GND,5V ---- GND,5V
Source Code
For curiosity, here's the original source code used for reverse-engineering. It's barely commented or user-friendly.
Pictures
- Original messy circuit
This is original circuit, assembled while I was visiting my parents. I couldn't find a 36pin centronics socket, only a (very) old 25pin RS232 cable, so I needed to use that.
- Newer clean circuit
When I came back home, I wrecked the original circuit, and made a miniaturized adapter with robust centronics socket. Not that I'd still really needed it - I've been already done with the rev engineering at that time - I just don't like messy cables.


