Difference between revisions of "Test Circuit used for ACID reverse engineering"
From CPCWiki - THE Amstrad CPC encyclopedia!
(→Pictures) |
(→Pictures) |
||
| Line 25: | Line 25: | ||
<gallery caption="Newer clean circuit"> | <gallery caption="Newer clean circuit"> | ||
Image:AcidTestHomeTop.jpg|Top | Image:AcidTestHomeTop.jpg|Top | ||
| − | Image: | + | Image:AcidTestHomeBottom1.jpg|Bottom |
Image:AcidTestHomeWorkplace.jpg|Nocash Headquarters | Image:AcidTestHomeWorkplace.jpg|Nocash Headquarters | ||
</gallery> | </gallery> | ||
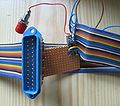
When I came back home, I wrecked the original circuit, and made a miniaturized adapter with robust centronics socket. Not that I'd still really needed it, I've been already done with the rev engineering at that time - I just didn't like messy cables. | When I came back home, I wrecked the original circuit, and made a miniaturized adapter with robust centronics socket. Not that I'd still really needed it, I've been already done with the rev engineering at that time - I just didn't like messy cables. | ||
Revision as of 11:40, 20 February 2010
ACID Reverse Engineering
Schematic
Desoldered ASIC chip from Fano's cartridge (thanks, Fano), attached to PC's parallel printer port:
 ACID        PC
 CLK    ---- Strobe
 CCLR   ---- Init
 SIN    ---- Busy
 /OE    ---- Select
 A0..A7 ---- Data 0..7
 GND,5V ---- GND,5V
Pictures
- Original messy circuit
This is original circuit, assembled while I was visiting my parents. I couldn't find a 36pin centronics socket, only a (very) old 25pin RS232 cable, so I needed to use that.
- Newer clean circuit
When I came back home, I wrecked the original circuit, and made a miniaturized adapter with robust centronics socket. Not that I'd still really needed it, I've been already done with the rev engineering at that time - I just didn't like messy cables.


