Difference between revisions of "Changing the drive belt"
m |
|||
| (12 intermediate revisions by 5 users not shown) | |||
| Line 1: | Line 1: | ||
| − | [[Category:Hardware]][[Category:DATA Storage]][[Category:CPC Internal Components]][[Category:DIY]][[Category:CPC History]] | + | [[Category:Hardware]][[Category:DATA Storage| ]][[Category:CPC Internal Components]][[Category:DIY]][[Category:CPC History]] |
Who doesn't know it: You want to load your favourite game, but you only get the "Disc missing" message from your CPC. Hmm, is the drive broken? No, in most cases you only have to change the drive belt. This is a step by step instruction on how to change the drive belt in a CPC6128. Changing the drive belt in other CPC types or the DD1 is nearly the same. | Who doesn't know it: You want to load your favourite game, but you only get the "Disc missing" message from your CPC. Hmm, is the drive broken? No, in most cases you only have to change the drive belt. This is a step by step instruction on how to change the drive belt in a CPC6128. Changing the drive belt in other CPC types or the DD1 is nearly the same. | ||
| − | + | '''Where to buy:''' Belts can be often bought on Ebay. They are either advertised specifically for the Amstrad CPC but also those for Spectrum+3 will work. The correct belt is 3mm wide, 0.6mm thick and has a total length (outer circumference) of 230mm (often also advertised as 115mm). If there is no other source available, one could look on AliExpress for belt sets (3mm wide, 0.6mm thick) which contain between 50 and 100 belts of different sizes. Usually 2-4 will have the right diameter, but it's a bit of a gamble. | |
| + | |||
| + | |||
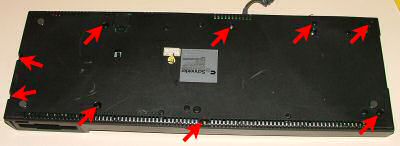
| + | 1. Remove the screws in the case of the CPC. You have to remove all screws on the bottom on the CPC and both screws on the side of the CPC. Now you can turn down the upper part of the case (Warning: please remember that the keyboard is connected to the board of the CPC). | ||
[[Image:Laufwerk-1.jpg]] | [[Image:Laufwerk-1.jpg]] | ||
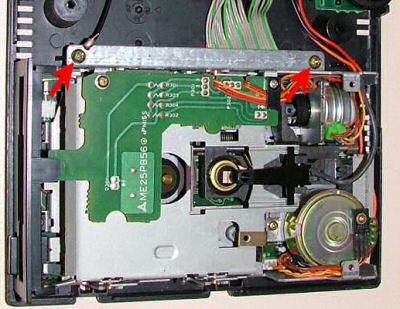
| − | 2. | + | 2. After you removed the top of the case you see the internals of the CPC. You can now remove the two screws which are on the left side of the disc drive. You already removed the other two screws in the first step. |
[[Image:Laufwerk-2.jpg]] | [[Image:Laufwerk-2.jpg]] | ||
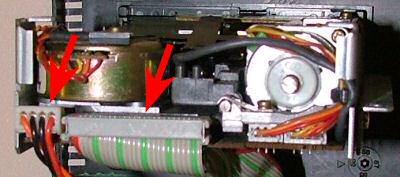
| − | 3. | + | 3. Now you have to remove the cable of the power supply and the data cable from the disc drive. Be carefull not to break the pins of the connectors. |
[[Image:Laufwerk-3.jpg]] | [[Image:Laufwerk-3.jpg]] | ||
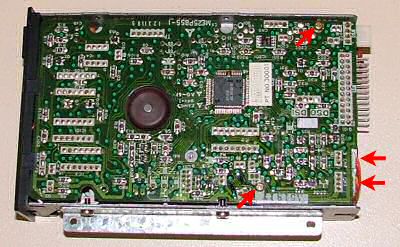
| − | 4. | + | 4. After you removed the drive you can turn it around and remove the screws of the drive. On the right side you can find another two connectors (you can see them in the picture of the last step), which need to be removed to turn down the board of the disc drive. |
[[Image:Laufwerk-4.jpg]] | [[Image:Laufwerk-4.jpg]] | ||
| − | 5. | + | 5. You can now turn down the board. The board is hooked to the faceplate of the drive, so remove it carefully. |
Now the drive belt is easy to change... | Now the drive belt is easy to change... | ||
[[Image:Laufwerk-5.jpg]] | [[Image:Laufwerk-5.jpg]] | ||
| + | |||
| + | |||
| + | '''Word of warning:''' When you're servicing your drive it's very easy for the write pin to fall out. The write pin is what is used to check if the disk inserted to the drive is write-protected or not. If the pin is missing, all the disks are seen as write-protected and hence no writing on them is possible. | ||
| + | |||
| + | The pin will fall out of the drive if you turn it upside down while working with it. It's very small and easy to lose, so it's important that you work with your drive on a desk or work surface and not, say, on your couch (where you won't even hear it falling). If it does fall out, this is where it goes: | ||
| + | |||
| + | [[Image:Wite_pin_loc.jpg ]] | ||
== Weblinks == | == Weblinks == | ||
| − | * [http://www.octoate.de/ | + | * [http://www.octoate.de/wp/articles/german/laufwerksriemen-wechseln/ Changing the drive belt (German)] |
| + | * [http://www.dataserve-retro.co.uk/contents/en-uk/d70.html Servicing the Amstrad CPC6128 Disk Drive], a great guide by Dataserve Retro. | ||
| + | * [http://www.fvempel.nl/belt.html 3" Drives: Drive belts] | ||
| + | * [http://www.classic-computers.org.nz/blog/2015-09-24-amstrad6128-acquire-fix-and-stockup.htm Amstrad CPC6128 - Acquisition, drive repair and software stockup] | ||
| + | * [http://cpctech.cpc-live.com/docs/faults.html Fault Diagnosis and Repair] | ||
| + | * [https://www.richardloxley.com/2017/02/01/repairing-amstrad-cpc-disk-drives Repairing Amstrad CPC disk drives | Richard Loxley Ltd] | ||
| + | * [https://www.youtube.com/watch?v=tKZCbHqEX_k Amstrad 6128 Disk Drive Repair & Service (Belt replacement, head cleaned)] | ||
| + | * [https://www.classic-computers.org.nz/blog/2015-10-08-amstrad-fd1-adventure.htm Amstrad external floppy disk drive (FD-1) adventure] | ||
| + | * [https://web.archive.org/web/20100428064625/http://www.pcwking1.netfirms.com/helpage18.html Fit a replacement Belt in a 3 inch disc drive] | ||
Latest revision as of 18:44, 6 November 2022
Who doesn't know it: You want to load your favourite game, but you only get the "Disc missing" message from your CPC. Hmm, is the drive broken? No, in most cases you only have to change the drive belt. This is a step by step instruction on how to change the drive belt in a CPC6128. Changing the drive belt in other CPC types or the DD1 is nearly the same.
Where to buy: Belts can be often bought on Ebay. They are either advertised specifically for the Amstrad CPC but also those for Spectrum+3 will work. The correct belt is 3mm wide, 0.6mm thick and has a total length (outer circumference) of 230mm (often also advertised as 115mm). If there is no other source available, one could look on AliExpress for belt sets (3mm wide, 0.6mm thick) which contain between 50 and 100 belts of different sizes. Usually 2-4 will have the right diameter, but it's a bit of a gamble.
1. Remove the screws in the case of the CPC. You have to remove all screws on the bottom on the CPC and both screws on the side of the CPC. Now you can turn down the upper part of the case (Warning: please remember that the keyboard is connected to the board of the CPC).
2. After you removed the top of the case you see the internals of the CPC. You can now remove the two screws which are on the left side of the disc drive. You already removed the other two screws in the first step.
3. Now you have to remove the cable of the power supply and the data cable from the disc drive. Be carefull not to break the pins of the connectors.
4. After you removed the drive you can turn it around and remove the screws of the drive. On the right side you can find another two connectors (you can see them in the picture of the last step), which need to be removed to turn down the board of the disc drive.
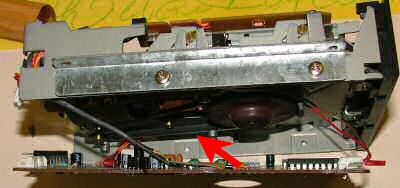
5. You can now turn down the board. The board is hooked to the faceplate of the drive, so remove it carefully.
Now the drive belt is easy to change...
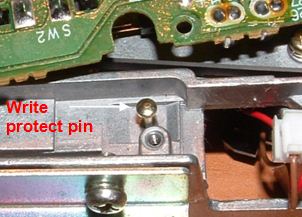
Word of warning: When you're servicing your drive it's very easy for the write pin to fall out. The write pin is what is used to check if the disk inserted to the drive is write-protected or not. If the pin is missing, all the disks are seen as write-protected and hence no writing on them is possible.
The pin will fall out of the drive if you turn it upside down while working with it. It's very small and easy to lose, so it's important that you work with your drive on a desk or work surface and not, say, on your couch (where you won't even hear it falling). If it does fall out, this is where it goes:
Weblinks
- Changing the drive belt (German)
- Servicing the Amstrad CPC6128 Disk Drive, a great guide by Dataserve Retro.
- 3" Drives: Drive belts
- Amstrad CPC6128 - Acquisition, drive repair and software stockup
- Fault Diagnosis and Repair
- Repairing Amstrad CPC disk drives | Richard Loxley Ltd
- Amstrad 6128 Disk Drive Repair & Service (Belt replacement, head cleaned)
- Amstrad external floppy disk drive (FD-1) adventure
- Fit a replacement Belt in a 3 inch disc drive
