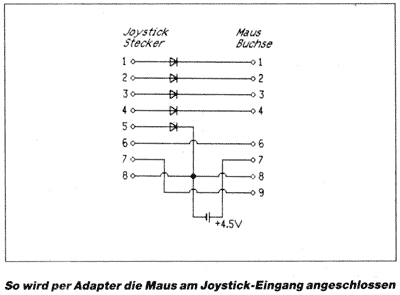
This adapter allows to connect Atari ST mouse and trackball.
Schematic
The schematic was released in german magazine "Schneider Magazin, 07/1988", apparently using 5 diodes and a 4.5V battery.
Aside from Atari-ST mice, the circuit should also work for Amiga mice, which are basically the same, but with XA/XB/YA/YB connected to other pins, which could be resolved at software side (or at hardware side).
 CPC Joy Port                     Atari-ST Mouse      Amiga Mouse
 JoyUp    Pin1 --|>|------------- Pin1 XB             Pin1 YA
 JoyDown  Pin2 --|>|------------- Pin2 XA             Pin2 XA
 JoyLeft  Pin3 --|>|------------- Pin3 YA             Pin3 YB
 JoyRight Pin4 --|>|------------- Pin4 YB             Pin4 XB
 JoyFire2 Pin6 ------------------ Pin6 Left Button    Pin6 Left Button
 JoyFire1 Pin7 ------------------ Pin9 Right Button   Pin9 Right Button
 JoyFire3 Pin5 --|>|------------- Pin8 GND            Pin8 GND
 JoySel1  Pin8 ------------------ Pin8 GND            Pin8 GND
 Batt4.5V (-)  ------------------ Pin8 GND            Pin8 GND
 Batt4.5V (+)  ------------------ Pin7 +5V            Pin7 +5V
CPC Plus Compatibility
The circuit reportedly doesn't work on CPC Plus computers. Probably simply because of the missing Fire3 signal on the joystick port of the CPC Plus (this could be fixed easily, by connecting the missing pin inside of the computer). There are also additional diodes in the CPC Plus, which may drop the voltages a little, but probably do not cause problems in this case.
Timings
The Atari/Amiga mice do output low-level signals, directly coming from the motion sensors. Ideally, software should check the signals more than 500 times per second. Using the CPCs 300Hz interrupt to check the signals might be a bit slow; it would work, but may miss some signals when the mouse if moved too fast.
Reading the mouse more often than 300 times per second would be better, but it'd require more CPU load since it can't be done via interrupts. Possibly best solution would be combination of IRQ and non-IRQ handling: Always check the mouse on 300Hz interrupts, and - if the program isn't busy with other tasks - additionally check it via polling.
Motion Signals
The XA/XB indicate horizontal motion (and YA/YB vertical motion), like so:
     One Direction            Opposite Direction
 XA  _______----____          _____----______
 XB  _____----______          _______----____
The signal timings depend on how fast the mouse is moved (ie. if the mouse is not moved, then it may stop anywhere in the above diagram, eg. while XA and XB are both high, both low, or one high and one low). The simpliest approach is to wait for raising edge on XA, and then to check XB (either XB is already high, or XB is still low) and increase/decrease the software's mickey counter accordingly. In situations where the direction changes, it may be also recommended to handle "half mickeys" on falling edges on XA, eg.:
     One Direction    Stop    Opposite Direction
 XA  _______---------------------------______
 XB  _____-------------------------------____
In the above case, checking only raising XA would miss the direction change on falling XA (if that happens repeatedly, then the mouse would disappear towards the screen border, eg. if the mouse is in an unstable position, without actually being moved).
